Deploying a Next.js app with Docker and AWS Elastic Beanstalk
February 26, 2022
(updated August 4, 2022)
Update as of August 2022:
I used to run this Next.js blog on AWS Elastic Beanstalk. I have since migrated over to Vercel. The whole migration took ~5 minutes and it costs me $0 a month. If you are thinking about deploying Next.js to Elastic Beanstalk, you might want to read the summary of why I migrated over to Vercel.
TLDR: If you have followed my previous tutorial on how to build yourself an epic blog with Next.js, you should now be the proud owner of a blog. At this point, you've probably asked your mom and everybody you know to visit your blog to read your ramblings. There is only one problem. You have not deployed your blog yet so nobody can visit it.
If you have not read my previous tutorial, you can rest assured for you can still follow this tutorial to deploy any kind of Next.js app in Docker on AWS Elastic Beanstalk.
Next.js + Docker
If you have never heard about Docker, the main idea is that it lets you define an isolated environment called an image. You define an image using a that contains instructions for setting up the environment inside the image.
To deploy our Next.js app, we could build our own image from scratch. That would involve finding a suitable base image to build upon, installing our dependencies inside the image and building the Next.js from source code.
We do not need to do that here because Next.js has an official Dockerfile up on GitHub that we can steal.
Watch out
If you are getting the error, you need to add to your file before building the image or the build will fail with the following error: .
Here's the settings you need to add (ignore the line if you are not using TypeScript):
Here's what the Dockerfile looks like:
You might notice there are multiple statements in this Dockerfile. This is because this Dockerfile defines a multi-stage build.
The idea is to use different environments for different stages of the build pipeline and only keep the bare minimum for our production image in the final stage. That helps keep the production image small in size, and it also helps minimize build time as build stages can be cached between runs.
Let's break down the Dockerfile to get a feel for what is going on in each stage.
Stage: Installing dependencies
This stage extends the base image, which is a Linux distribution commonly used in Docker images - it is a bare bones Linux distribution. The variant comes with installed.
We copy the and files into the Docker image in an directory. These two files are the files that dependency manager uses to keep track of the dependency tree for your project. Then we install our dependencies in (in the image).
If you are using instead of , then replace with and replace with .
At this point, your image is a environment with all of your node dependencies installed inside.
Stage: Building
In this stage, we grab the installed in the previous stage () and copy them over into a directory in this stage.
We also copy the content of the host directory (that's the directory on your computer that contains the and the rest of your Next.js files) into the image. We run (or ) to generate an optimized version of our Next.js application for production.
Stage: Production
This is the last stage, we grab the files from the previous stage () and copy them over into this new environment. We set the environment variable to - that variable is used by Next.js (and can be used by your application code too) to make decisions based on which environment the app is running in.
The image now contains all we need to run the project in production.
You should also have a file in the root of your project to prevent Docker from copying certain files into the image:
You are all done with the Docker setup. If you want to try out the image locally, you can run the following commands:
Your app should now be running at http://localhost:3000.
AWS Elastic Beanstalk
AWS Elastic Beanstalk (EB) is a noob-friendly service for deploying and managing web applications. It lets you deploy your application on a dozen different available runtimes.
There's a runtime for Python, Node.js, Go. There's even one for .NET. There is also the option to deploy your app as a Docker container instead. That's the option we are going to be using here.
The main reason to use Docker here is to maximize flexibility and control. With Docker, you can define your own runtime using a fairly generic tool instead of having to mess with Elastic Beanstalk-specific configuration such as obscure config files.
Elastic Beanstalk helps you with things like building the image, but it also helps you run your app in general. It lets you add load balancing, SSL/TLS termination on the load balancer, rolling deployment, centralized logging with AWS CloudWatch, among other things.
Deploying a Docker container on AWS Elastic Beanstalk is significantly easier (but more blackbox-ish) than deploying on a Docker-based service using an orchestrator such as Kubernetes or Amazon Elastic Container Service (Amazon ECS). All it takes to deploy an app on AWS Elastic Beanstalk in Docker is run a couple of commands on the .
With Amazon ECS, you would have to build the Docker image, push it out into a container registry (such as ECR), define ECS tasks, define ECS services, spin up an ECS cluster, configure a bunch of things with the load balancer and so on.
With a cloud-managed Kubernetes cluster such as Amazon Elastic Kubernetes Service (EKS), you would have to pay for the control plane and set up much more complex configurations.
Deploying to AWS Elastic Beanstalk
Prerequisites
-
Modify next.config.json to automatically copy traced files see here. Your file should enable ; add it if you haven't already:
-
Create your Next.js project and have the Dockerfile and .dockerignore file at the root of the directory. Your project tree should look something like this:
Create AWS Elastic Beanstalk environment
An Elastic Beanstalk environment is a collection of AWS resources that you can deploy your Elastic Beanstalk application on. You can create an environment using the aws-cli or using the console.
The type of environment you want to create for this app is Web server environment (the other type is Worker environment, which is used to run scheduled tasks).
The default configuration is good enough for most cases. The only fields you need to fill out are:
- Application Name: whatever name you want (e.g. your-app-name)
- Environment name: whatever name you want (e.g. your-env-name)
- Platform: choose Docker
- Platform Branch: choose Docker running on 64bit Amazon Linux 2
That's it, you can go ahead and Create environment.
About load balancing
The most notable piece of infrastructure that AWS Elastic Beanstalk sets up for you is the Application Load Balancer (ALB) that routes traffic to an EC2 Autoscaling Group managed for you. AWS offers a handful of different Elastic Load Balancers (ELB).
Different load balancers operate at different layers of the Open Systems Interconnection (OSI) model. Some operate at the network level and fan traffic out to the instances at that layer. Others operate at Layer 7 (application layer).
An ALB is a Layer 7 load balancer based on NGINX. What it does is act as a reverse-proxy that takes in traffic and according to a set of routing and load distribution rules, routes traffic to the instances that your service is running on. The ALB also handle SSL/TLS termination - that means ingress traffic over HTTPS will be decrypted by the load balancer before being proxied on to the AWS-managed EC2 instances your app is running on.
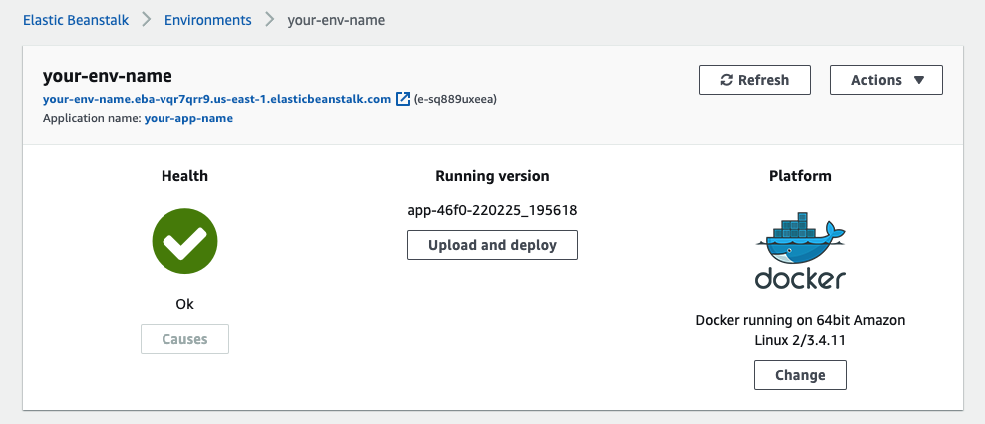
At the end of the process, you should be seeing your new environment in the console:
Create AWS Elastic Beanstalk config.yaml
To initialize an Elastic Beanstalk environment, run:
The CLI will guide you through a series of steps for creating an AWS Elastic Beanstalk application.
- Select a default region: must be the same region that you created your environment / application in during the previous step
- Select an application to use: select the application you created in the previous step
- Do you wish to continue with CodeCommit? (Y/n): unless you have a reason to use it, pick No
This will create a YAML config file . That file contains all the information that the aws-cli needs.
You should end up with a config that looks like the following:
Deploy
Important: the commands appear to be using your repository to determine which files are part of your projects. You must commit your or the aws-cli will ignore it and the deployment will fail.
Almost done, now run:
This command will zip your project files up into a ZIP file and upload it to an S3 bucket. AWS will then build your Docker image (on the EC2 instances managed by your AWS EB deployment) using the and deploy the container on your EC2 instance deployed by AWS EB.
You can find the domain for your app in the console (e.g. in the screenshot below):
That's it, your app is now up and running on AWS Elastic Beanstalk. In the next article we will see how you can set up CI/CD with GitHub Actions to automate the process of deploying your app.


